TCR10 Auto Power Window Wind Up mod/hack
Toyota Tarago 1990-1999 Some models didn't come out with the Auto wind window up option.
I will show you how you can customize your current switch to also have the Auto wind-up function.
should only take 30min to do this.
Remove faceplate.


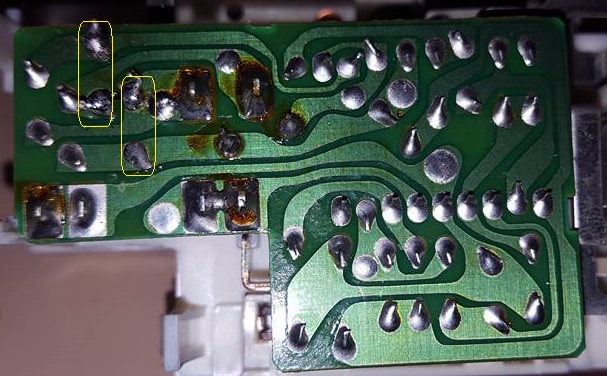
Remove the bottom cover to uncover the circuit board.

Find the missing 2 X 1 Amp Diodes

Now solder in your diodes

Remove 3 screws and take top cover off.
Take your time as there is loose parts inside.

3 white parts I marked have white grease on them and will hold in place if you are not careful they can fall out and there are mall springs behind them.

These parts I marked also sit loose and have one way to be placed back on.
Wrong-way the button will not work.
Also a good time to clean the points.

Where I marked with arrows is what's stopping the button
from being pressed that little bit more forward for Auto-UP.

I trimmed where I marked the lines as I found that easier.

Not my best work but it did the trick.

Now remove the button and again very carefully as there is a pin that can fall off.

Once the button is out, the white part of the button needs to go back in first.
Can be a little tricky and now would be a good time to take a break.
This part can be even more tricky with the small pin wanting to come off but once you have
it in place it gets easier from here on.

This is the little pin to look out for.
If you lose it then game over. But all is not lost.
You will need to solder a jumper wire where the 2 contacts meet and you will no longer
have this button functional.
You do need to solder a jumper if the pin is lost otherwise the
passenger window will not work.

So now the bottom part is in place you can go ahead and put the top cover back on.
Carefully making sure all small parts are sitting correctly in place as you push the cover down.

Put the 3 screws back in and you should now be able to feel that the driver window switch auto option working.

Now here is the trick that got me the first time.
Before and After.
Notice the before image the bottom part is squared.
You need to trim it to look like the after image.
This will allow you to push the top part of the button down and clip it into place with a little force and wiggling it at the same time.


Now the jobs done.
Put the top face cover on and put the switch back in your van.

No comments:
Post a Comment